With the rise of COVID-19 in the public conscious and the shortages of medical supplies around the world, various makers are rising up to help their communities combat the virus. There are a lot of different designs that have popped up and the different variations have their merits. My dad and I experimented with a few variations and came up with one that is pretty effective, cost efficient, and quick to make. This has allowed us to mass produce a lot of masks to give nurses, their families, and nursing home staff that are looking for a comfortable solution to protect them while going to the grocery store or to coming into contact with others.
Like many sewers, we found that we had an excess amount of left over cloth fabrics from old projects. After doing some research, it turns out that tightly woven cotton fabric is the best mix of comfortability and capability in blocking the passage of germs. Many medical professionals have pointed out that a mask does the wearer no good if it is uncomfortable because it will only promote touching one’s face or will cause the wearer to take it off.
We also found that it was increasingly difficult to acquire elastic for the masks, and it got a little pricey once we did find it. An alternative, and the one that we ended up using for our mass production, was the common black hair tie. Many who have worn our masks find that our thinner hair tie that we use is a lot more comfortable than even the elastic on proper N-95 masks. It is important to go with a thinner hair tie, thicker ones have a tighter elasticity and are a lot less comfortable.
To make our mask you will need:
- A Sewing Machine with any color thread and bobbin.
- A pair of scissors
- An iron and board
- 2 hair ties
- 2 cuts of cotton fabric 6″ x 9″ (bonus if you use two different fabrics as the masks are reversible). I recommend that you use patterns that do not have a “correct orientation until you have mastered the design.

Identify the weak links on the hair ties. Cut at the weak point so that they will not be a point of failure in the elastic for the masks later].
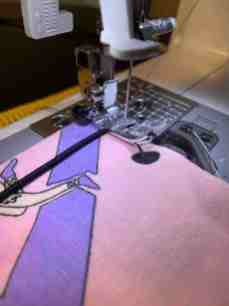
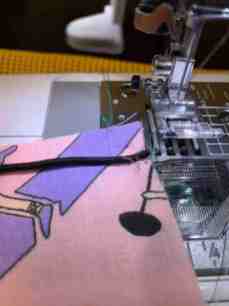
Choose one of your pieces of fabric with the right side up. Place one of the hair ties so the end is hitting about 1/2″ or so from the top of the 6″ edge of fabric. Place the hair tie behind the needle on your machine, backstitch and sew once more over the hair tie to tack it into place.
Take the other end of the hair tie down to the bottom of that 6″ edge of the fabric, and tack it down the same way. You should end up with a nice U that opens up to the 6″ side. Do not worry about cutting the excess thread off of the hair tie as it will mostly end up hidden later on. Repeat on the other side.
Place you other cut of fabric on top of your first cut so that the right sides are facing each other and so that the 6″ sides are on the left and right with the 9″ sides along the top and bottom. Match up the bottom right corners of your pieces of fabric. The hair ties are going to slightly bunch up the bottom piece and that is okay, for now, we just need that one corner to line up. Place your needle and foot about 2 1/2″ inches up that right edge from the bottom right corner. We are looking to have between an 1/8″ and 1/4″ seam allowance during these steps, but it is perfectly okay if you need to give or take a little bit due to imperfections in the fabric. Start with a couple of back stitches and then continue stitching down to about 1/8″ to 1/4″ from the bottom right corner of the fabric.
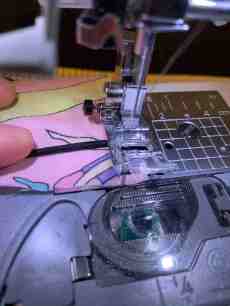
Once you hit the corner, keep the needle in the down position. Lift up your foot and turn your fabric 90 degrees. You will notice that every time you get close to the hair tie or have to sew over it that your needle may struggle a little bit, especially if you are starting at the top of a new edge. If you run into a snag, lift up your foot and manually reposition the fabric so that the needle can make it over the tie or assist your foot by helping to manually push the fabric through from the left. Stitch along the 9″ side until you are ready to round the next corner. It’s always good to double check as you go that you have not missed the bottom piece of fabric with your stitches.
Turn the corner again. This time, make sure to page the hair tie up against the sewn edge so that it does not get get caught while you sew along the 6″ edge of the fabric. For the first few inches focus on keeping this top corner flat and flush. Then stop your needle, pull the bottom of the hair tie towards the unsewn 9″ side, and flatten out the bottom corner while you sew to that corner. This is probably the trickiest part of the project, but you will gain the finesse you need after a couple of them.
Turn the corner again and run down the other 9″ edge. As you turn the last corner, tuck the last hair tie back into the envelope of fabric that we have been making just enough not to sew it out of shape on this last edge. We are going to leave a couple inches between where we started with our first back stitch and where we are going to end our stitch. The length here is not a precise measurement.
Once you make it to your end point, give it a couple of back stitches and reach into the hole between your stitching to pull the piece inside out. Go to each corner of the rectangle and try to tug each end into more of a 90 degree angle. These do not need to be perfect, but you don’t want too much bulk to stay in the corner. make sure to tuck any loose threads into our envelope of fabric before continuing to save work later.. The hole that we left in the stitch should naturally make the fabric fold about an 1/8″ inward. Finger press these together.
Keep this gap in the fabric pressed together. That open 6″ edge is going to get placed under our needle with the needle staring above the open gap. We are going to sew very tight towards the edge of the fabric as we sew around the rectangle. the goal is to both close this edge, but also to help contain the bulk of what is inside the piece. Sew down to the corner.
Turn the corner and sew down the long edge. Turn the corner one more time, but this time we will do something a bit different. We are going to start building our pleats. To do this without pinning or marking, lift up the foot on your machine while your needle pins the corner. We are going to grab about 1 1/2″ inches from the top of the 6″ edge and tuck that corner towards our needle by about 1/2″. Drop your foot and start sewing, but hold this fold down with your fingers. If your foot starts to push the fold up, just lift up the foot again and drop it on top of it. Once you get on top of the fold pause.
Next we are going to sew down our other pleat. Grab between 2 1/2″ to 3″ from this point and fold it about 1/2″ towards the need. Sew down to the corner, using that same trick of lifting the foot when necessary. When making these pleats, you really want to keep the edge of the pleat and the fabric in line. This makes it look and feel the cleanest. Turn the corner.
Sew all the way down the 9″ side and turn the corner again, lifting the foot. This time we are going to fold the pleats towards us. When making your folds, try to match the placement of the folds on the other side. Sew down until you near the end of the first pleat.
It makes it a lot easier to fold the second pleat while the needle is still on top of the first one. Do the same thing that you did before and match the second with its partner on the other side. Sew down to the bottom corner and then backstitch to finish the sewing job. Make sure to cut all of the loose threads, which should mostly be on this last edge of fabric.
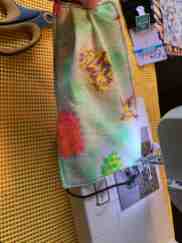
Take your piece to your iron and iron the pleats down from the center out on each side. Now your mask is complete!
Now go make about a few hundred more for your family, friends, and local medical heroes so they don’t have to go around covering their face with a scarf!


